Hiking In The Dark

At the end of last July I fulfilled a lifelong goal by climbing to the top of Mt. St. Helens.  Ok, this wasn’t a “goal” until last year, but I had always thought it would be cool to stand on the rim of the crater and look down inside, never imagining that I would actually do it.  The climb to the top was both challenging and exhausting, full of giant rocks and ash but getting to the top was worth every agonizing step.  So, when the on sale datef for 2017 permits was announced I decided I needed to go back and somehow managed to talk Cristina and my friend Shanelle into joining me.

When the permits went on sale at the beginning of February we (I) decided on June 12th for our climb.  I figured that would allow for more than enough time for a majority of snow to melt off.  However, in my excitement there were two things I didn’t account for.  The first being that last year as really dry and it didn’t snow much, so I didn’t have to deal with any snow on my last climb.  The second thing I didn’t account for is that we just had a harsh winter with a lot of snow in the mountains.  As the date of our climb drew closer it became clear that we would be dealing with snow, something neither Cristina or Shanelle signed up for.  I reassured them that the snow would actually make things easier since it would cover all the giant rocks that made things difficult for me last year and promised to teach them how to use an ice axe.  I did, however, downplay the fact that we would have to take the winter route which adds an additional 2 miles and 1,200 feet of elevation gain.

After months of waiting the day came and we headed to our campsite at Beaver Bay campground in Cougar, Washington (I may have let my inner child choose the campground just for the jokes).  Once we arrived and set up camp I began to float a fantastic idea I had..  to hike at night!  This idea was mainly due to the fact that I was slightly concerned about a couple things. One was that it was starting to warm up during the day which meant that the snow would turn to slush and make things really slippery. The other concern was that the forecast called for rain in the afternoon, which would block any views we would have from the top. I tried to sell my idea by mentioning that we could make it to the rim in time for the sunrise, which would be an awesome sight.  Somehow I was able to convince both of them that hiking at night was a good idea and we decided to head to the trailhead around 11:30 PM. Yeah, they probably didn’t think it was “a good idea” but they were on board.

The next thing I knew it was time to head out and we started to make our way to the trailhead. This presented the first obstacle to hiking at night, finding the trailhead in the dark.  I somehow missed a turn and we ended up going much further east than we needed to.  However, we did get to see a huge elk as it darted across the road in front of us; we were all suddenly wide awake after that. After our hour long detour we finally found the trailhead, which was surprisingly full of cars and tents, they must have known how easy it is miss the turn in the dark. While there were plenty people camping out to get an early start, we were the only ones that were gearing up to head out at 1 AM.  We found the trail and headed out.. to climb a volcano.. covered in snow… at night.
The trail cut through the trees, starting out gently and snow free as everyone acclimated to hiking by headlamp.  Shortly down the trail I somehow spotted a spotted owl, who i’m going to say was named Spot, perched in a tree next to the trail. I’m sure Spot wasn’t too happy about all three of us blasting it with our headlamps as we stared at it for a minute or two but it was a nice way to start the hike. As we continued on we started to encounter patches of snow with a nice worn trail, as planned the snow was frozen and easy to cross.  Once the snow became more prevalent we threw on our microspikes, which made hiking in the snow drastically easier, and continued on.  As we emerged from the trees we heard water flowing over Chocolate Falls, we stopped to take a look but couldn’t see much in the dark.  Not only was it dark but it had gotten a bit foggy as well, which caused the light from our headlamps to only illuminate the area 3 feet in front of us. We continued up the trail which eventually began to get hard to follow.  I checked the GPS and discovered another challenge of hiking in the dark, we had started to follow a different trail than planned.  Not knowing if it would eventually re-join with the main trail we backtracked and rejoined our intended trail, this is when things started to get a bit steep.

Since we were starting to really climb upwards in the snow we broke out the ice axes before continuing up the snow field, luckily none of us ended up slipping and having to use it.  Up until this point we hadn’t seen another person on the trail at all, which was really nice, but were quickly passed by two girls that we watched fly up the trail, they must have had super powers. After a bit of traveling in the snow we hit the rocky spine of the trail which was surprisingly snow free.  While it had gotten a bit lighter out at this point navigating through the rocks was a bit tricky, I don’t think I adequately explained the volume and size of rocks and boulders to either Cristina or Shanelle ahead of time.  As we continued on we heard a loud noise, which I can only describe as a cross between a roar and a screech, it seemed to be coming from multiple directions. I swear it was above us but was unable to see anything because of the clouds,  Cristina and Shanelle thought it might be elk or some other animals. We were all pretty tired at this point so who knows what we actually heard.  I still say it was a pterodactyl circling above us.

Next thing we knew the sun began to rise and the clouds appeared to erupt out of the mountainside. We took a break to take in the view, have a snack and asses our progress.  We were just short of the weather station which meant while there wasn’t much distance to cover there was still a lot of elevation gain left.  It’s at this point we decided to turn back, while everyone could have made it coming back down wouldn’t be easy, despite being able to glissade for part of it. Not to mention we were all thinking about crawling into warm sleeping bags and getting some sleep.  We threw our packs back on, and started to head back down.

On our way back down we started to pass people as they were heading up. Some of them were friendly but a lot of them weren’t, which was suprising.  We did however have fun responding to people when they asked “You already summited?!”. I think my favorite was “Yep, second time today”. The question got old really fast though.  I was surprised by the number of people hiking up with snowboards, had to be a fun way to get down. Sure enough, on our way down the snow had already started to turn to slush, it would not have been fun to try to hike through slush with rubber legs had we continued.

Once we made it back to the campsite we got some much needed rest, only to be awoken by an obnoxiously loud garbage truck emptying the abundance of trash cans scattered through the campsite.  We then decided that since we already went up it was time to go down, so we headed to the Ape Caves.  The Ape Caves, otherwise know as lava tubes, were formed by the flow of, you guessed it, lava. Apparently they are called the “Ape Caves” because some miners claimed they were attacked by apes when they were down there.  I was a bit nervous as there are plenty of bats in the ape caves and i’m not a fan of bats,  luckily there were no bats in the section we explored.

As you might expect it was a bit chilly inside, and just like during our hike up Mt. St. Helens we made good use of our headlamps. Our final destination was what is known as “The Meatball”, I have no idea why they call it that.

After exploring the Ape Caves we returned to the campsite at Beaver Bay, in Cougar, (heh) and enjoyed relaxing around the campfire with plenty of s’mores making their way into my tummy. While we didn’t summit Mt. St. Helens we still got to hike at night, which was an awesome idea. We had the trail to ourselves, avoided slipping and falling in slushy snow, met an owl named Spot, heard a pterodactyl, and got to watch the sunrise.

Serenity Now!

A few weeks ago I welcomed one of my best friends back to Washington by introducing her to one of my favorite easy to get to hikes, Lake Serene. While it is a bit of a drive to get to from the Seattle area the trail head is just off of Highway 2 and not down some long bumpy forest road like many others are.

We set out Sunday morning guided by Waze as I was not awake enough to trust my own navigation skills. Plus, i’m always a bit amused by how the British navigation voice pronounces things,  our favorite of the trip was “Mt. Index” (say it fast and use your imagination).  When we arrived at the trail head we found that the parking lot was already full, luckily there was still parking along the Skykomish River.  We threw on our packs and started  down the trail.

The trail starts off pretty flat along an old road which splits almost immediately. A sign points you in the right direction but every time I visit  I find myself wondering  where the other fork goes but have yet to find out. Even though the trail is a popular one, the first bit of the trail is dense with foliage that you have to work your way through before it opens up into a wooded forest.

A little more than a mile and a half in you can split off on to the half mile trail up to Bridal Veil Falls, which is beautiful. However, we had both been there before and with the parking lot as full as it was we knew it would be pretty busy, we were on a mission to get to the lake.  However, here’s a picture of the falls from one of my previous visits in case you were wondering what it looks like.

After the turnoff for Bridal Veil the trail continues through the forest  before crossing a bridge over a smaller waterfall, which is sadly mostly obscured by trees. The trail then drops down to another more impressive waterfall, but not as impressive as Bridal Veil itself. This is a good spot to stop and take in the view and have a snack as the trail is about to get a little harder.

As soon as you move past the falls the trial gets rocky and starts to gain elevation quickly.  All that flat is a thing of the past. As you head up you can take a look back and see part of the falls through the trees. The trail turns into a series of switch backs as you continue upward, some times rocky and sometimes including steps. Luckily it seemed as if  most people were headed for the falls as the trail wasn’t that crowded. Navigating around the rocks and tree roots is extra challenging when it’s crowded, especially with hikers that don’t follow proper trail etiquette.

Once you make your way a bit further up you pass through clearings where you can catch glimpses of the surrounding mountains and the river below. All that time working the switchbacks finally starts to payoff with some spectacular views on a clear day. The trail crosses through a water fall as you begin your final push up to the lake catching views that are more impressive than the last.  Right before you reach the lake you will see parts of Mt. Index shooting upwards towards the sky.

When we arrived at the lake we found that there was still a bit of ice covering it and clouds rolling down the side of Mt. Index.

As we took it all in the clouds began to shift and expose different parts of the mountain.
But as we were staring up at the mountain someone was staring at our snacks. He wasn’t as sneaky as he thought he was, i’ll give him an A for effort though.

You can begin to work your way around the lake crossing over a bridge at the top of the runoff  that turns into falls. Right after the bridge you can follow a short trail to the right to look over the valley below.

The trail continues around to “Lunch Rock” which is a big flat rock perfect for taking a break and … having lunch..  before you head back down.  We, however, had other lunch plans and after enjoying the lake started to make our way back down. The trip back can be just as challenging as the way up, if not more so. All those rocks you have to climb over on your way up are now tricky obstacles to navigate on your way down, the last thing you want to do is roll an ankle. It’s funny how quite hikers get as they are focused on their footwork.  The final stretch of the trail before the trail head, that nice flat beginning of the trail, seems to drag on forever and seems to be longer than it was on the way up.

Once you reach your car and begin your trip home you’ll face another, and perhaps unexpected, obstacle of the hike. Traffic on Highway 2. It can be very slow going on the 2 lane highway as you make your way through Gold Bar, Startup and Sultan.  When we finally hit Sultan we made a stop for lunch at Bubba’s Roadhouse.  In keeping with my tradition of getting the most ridiculous burger available after a hike, I had to get the one that had pulled pork, bacon, ham and fried onions on it. I wonder if I consumed more calories than I burned?

In a tent down by the river

Months ago Cristina and I decided to go backpacking over Memorial Day weekend.  We figured that we would have plenty of places to choose from by then, sadly that wasn’t the case. When Memorial Day weekend finally rolled around the snow we had gotten over the winter was still preventing us from getting to our favorite backpacking spots. The plan then shifted to car camping, a weekend full of campfires, playing in a river and s’mores. This also proved to be challenging, finding a car camping spot the week before Memorial Day is not an easy task.  I first checked the national parks and found all their were all fully booked, I then checked the state parks and found the same. It was beginning to seem like we may have to try our luck at snagging a walk in spot when I discovered that King County has a campground, which still had a couple spots available. I never would have guessed that King County had a campground. They were “hike in” spots, with the “hike” being a very flat half a mile long. Although, a hike without an elevation gain is just a stroll in the woods as far as I’m concerned. I booked the site and began digging out  my camping gear for the first time in almost a year. While it wasn’t the backpacking trip we hoped for it would allow me to to test out a few things in preparation for the PCT.

Friday afternoon we drove out to the Tolt MacDonald Campground  on the Snoqualmie River just outside of Carnation.  All the standard sites that did not require a hike to get to looked miserable, very close together with no shade and very little privacy, luckily our site was on the other side of a really cool old suspension bridge away from the crowds.  Since we had fully ditched the idea of “roughing it” in favor of the comforts of car camping we packed a wheelbarrow full of gear, food and firewood and started to make our way to the site.  After crossing the bridge we were greeted by a sign that read “Attention: Frequent bear signings.  I got very excited, I’ve always wanted to meet a bear, but not in the “Grizzly Man” kind of way.

As we “hiked” down the trail, dragging the wheelbarrow behind me I started to wonder why I felt the need to invest in ultralight gear for the PCT when I could just bring a wheelbarrow. Who needs a $300 backpack when you can pick up a wheelbarrow for $50? I already have a tarp to keep everything dry.

Once we arrived at our site we discovered that not only was our site much more shaded and secluded than the sites on the the other side of the bridge. The other 3 campsites in the areas were vacant for the night with campers arriving on Saturday, which was a nice surprise. We set up my not so light my 3 person tent, blew up the air mattress and got settled in. After a bit of exploring, finding the best spot to access the river, we started a fire and made some dinner. Later that evening I proceeded to eat 10,000 s’mores and discovered that s’mores and beards don’t play well together.

The next morning, after it became very clear during the middle of the night that I had forgotten my throw out the air mattress due to the fact that it did not actually hold air, I decided that I needed to invest in a good sleeping pad for the PCT because the ground can be very cold.  Luckily, we did have sleeping pads just in case something like with this happened.  After coffee and breakfast we spent the day doing the typical camping things like relaxing all over the place, playing in the river and reading.  I was reminded how nice it is to disconnect and enjoyed every minute of it.

Later in the day the other campers in the area showed up, the most notable being two families with a total of six small children and one very large Great Dane. Sitting next to the fire we watched as one of the guys made frequent trips up and down the trail hauling wheelbarrows full of stuff and setting up giant tents. The kids took full advantage of the fact that their parents were overwhelmed with getting everything set up, running amok and harassing each other, luckily the crying was minimal. Maybe that’s why I liked camping so much as a kid, my brother and I could get away with much more than normal because our parents were busy managing all the logistics involved in camping with two small boys.  They two families were still working on getting set up as the sun began to set, the air pump was constantly being ran to fill up what seemed like 20 air mattresses. Cristina and I made a game out of counting the number of times the air pump would run and betting on if they were done or not. I think it was completely dark by the time they were finally done.

One of the things I put to the test is wearing what I would wear while hiking the PCT.  This consisted of shorts, a hiking t-shirt and a pair of trail runners. I also had a pair of merino wool leggings and a merino wool hooded shirt for when it got cold at night. While these did a good job of keeping me warm I was reminded that I still needed a puffy jacket, luckily the fire made up for the fact that I didn’t have one. Another thing I put to the test was the claim that merino wool resists odors by wearing the same clothes for the duration of the weekend, luckily for Cristina this claim was in fact true. That night I once again ate 10,000 s’mores.

On Sunday I spent some time exploring the trails in the park a bit. They weren’t anything special but it was nice to get out and stretch my legs a bit. After exploring I spent time relaxing and finally getting around to reading that PCT book I mentioned in my first post.  We considered making the drive to an actual trail to do some hiking but decided we’d rather just  spend the time relaxing, especially considering how busy the trails would be on a holiday weekend.  Later in the day after making a run for firewood, ice and beer we ran into the guy that was making all the trips with the wheelbarrow the night before, he was now making frequent trips in the opposite direction. It seemed that they were defeated by their kids in just one night. I couldn’t help but be reminded of a quote from Varsity Blues. “I don’t want your life.”

After our final night I felt better about a few things I’ll have to deal with while on the PCT. My merino wool clothing kept me warm and didn’t end up smelling after wearing them for days straight, bathing in a river is refreshing, VIA kept me fully caffeinated, I can still sleep on a pad without rolling off of it and I can fuel myself with s’mores.  Ok, I probably wont be making many s’mores on the PCT but snickers bars will be a staple in my diet, my body knows what to do with sugar.  So while it wasn’t the backpacking trip we had hoped for it ended up being really nice to just take a few days to relax together and have a few extra comforts that we wouldn’t have had while backpacking, like s’mores (ok, we could have had s’mores while backpacking).

On our way home we decided to stop by Snoqualmie falls which did not disappoint.  It was however full of people which made me feel a little better about taking the weekend off from hiking. In fact I later read a trip report where a hiker counted 200 cars near a trail head that weekend.  Sometimes it’s best to avoid the crowds, disconnect and relax. 


Backpacking is in tents

Picking out a tent you’re going to spend months living in isn’t a decision one should take lightly, especially when you’ll be facing a plethora of weather conditions and having to set up and tear down your tent almost every day.  Finding the right balance between weight, function and durability can be a difficult one.  There are some really lightweight tents out there but I find myself questioning how well they will hold up on the trail, the last thing you want is for your tent to fail when your days away from civilization in a massive storm.  While I currently have a hand me down 2 person North Face Tent which does the job, is a bit bulky and heavier than I’d like. Plus it’s a bit old, so I don’t know if I trust it.

I considered making weight my top priority, looking at tarps and bivys ,but decided an actual tent would provide me with an extra bit of comfort and sanity that I’ll need while out on the trail. As I started my search  for a new tent my only prerequisites were that it be a 2 person tent and weighs under 3 lbs. While I am in fact only one person I like the idea of  having the extra room a 2 person tent offers, allowing me to either protect my backpack from the elements and critters by keeping it inside the tent, or have enough room for Cristina when she joins up with me to hike some sections.  Here are the tents I’ve taken into consideration:


MSR Carbon Reflex 2  

Nice and light weighing in at 1 lb 13 oz with  zipper free vestibules and dual doors.  It also has a “Fast & Light” configuration where you combine the rain fly with a footprint, cutting 6 ounces of weight when conditions don’t call for a full tent setup. This was my first pick when I began looking for a new tent but the negative comments about the rain fly, comparing it to saran wrap, made me reconsider. There were other comments stating that the materials were prone to punctures and tears, which doesn’t sound like a fun thing to have to deal with. Another point that I realized is that I needed to take into consideration is that the Carbon Reflex 2 is a non-free standing tent, like the North Face tent I currently have. The idea of having a tent that can be completely freestanding is appealing because finding the right area to steak out your tent can be difficult, especially if the ground is hard.  The Carbon Reflex 2 retails for $499.95, which I would gladly pay if I wasn’t so worried about the durability.

MSR FreeLite 2 

Another light MSR tent, heavier than the Carbon Reflex at 2 lbs 7 oz but still well under 3 lbs, and freestanding!! Awesome! Like the Carbon Reflex it has dual doors and a “Fast & Light” configuration which reduces the weight by 7 ounces. I was ready to order (and it was actually ordered by accident) until I  read a review stating that when the rain fly was added the ceiling was lowered by by 4 inches and the walls bowed. Being tall I need all the room I can get, so that was an immediate red flag. Also, it’s not really freestanding! with only one point of contact on one side it needs to be staked down as well. The Freelite 2 is a bit cheaper than the Carbon Reflex at $439.95 but the alleged space issue and my added criteria of a freestanding tent kept me from going through with the purchase.

Mountain Hardware Ghost UL 2 

This tent looks amazing on paper.  2 lbs 9oz , freestanding and 2 person! Unlike the MSR tents the Ghost UL  only has one door, which in itself isn’t a deal breaker. However, I once again lost interest when I read the reviews and saw comments about the tent being fragile. One reviewer stated that the material ripped when it brushed against a rock. Another reviewer called out the fact that the rain fly sags and design flaws which makes it hard to get in and out of. The Ghost UL is priced at $449, the same as the MSR FreeLite 2, but the potential for frustration seems high with this one.


Big Agnes Copper Spur HV UL 2

When Cristina and I went to the PCT class at REI a few months ago the presenters mentioned the popularity of Big Agnes and after taking a closer look I can see why.  The Copper Spur HV UL is freestanding, has 2 doors, and a maximum height of 40 inches!  At 2 lbs 12 oz it’s the heaviest out of the tents I’ve considered but a little extra weight can go a long way.  It has a “4-way high volume hub design” for added strength and some magical “Proprietary random rip-stop pattern nylon” which makes it extremely durable. It also has some nice pockets for keeping things organized. The price is inline with the other tents I considered at $449.95 and at this point is my choice. Let’s see if that remains the case when I go to buy it this weekend.

There are a number of other great 2 person tents which weigh in over my self imposed 3 lb limit, such as the Nemo Dagger 2P and the REI Co-Op Quarter Dome 2 , both of which are cheaper than those above. If you’re looking for a lightweight tent for backpacking I’d take a look at those in particular.

PCT Resources

I am finally moving past drooling over new backpacking gear and starting to dig into the actual planning of my trip on the Pacific Crest Trail.  There are a lot of things to take into account such has how much you can hike in the day, resupplying, rest days  and making sure you know where you’re going.  Luckily there are a lot of resources out there to help you plan your trip and help you while you’re out on the trail.  While I still haven’t read that book I mentioned in my first post I have found a lot useful sites online, here are a few of my favorites:

Pacific Crest Trail Association – The obvious place to start, the groups that preserves and promotes the PCT,.. and issues your permit. Tons of information about the trail, it’s history an the volunteers that support it.  Throw a few bucks their way if you can.

Halfmile’s PCT Maps – The name says it all, maps. Not just any maps but  the most current and accurate PCT maps available. They have maps that you can print (which would take a ton of  paper), GPS downloads, apps for Android and iOS, and  my favorite, a Google Earth map (really, take the time to load it up and check it out, it’s pretty awesome).

Craig’s PCT Planner – A really cool tool that lets you plan out your hike section by section. By just picking your start date, entering your pace and set the hours you want to hike in a day it will generate an itinerary for your journey. It accounts for increased travel time due to elevation gain and allows you to insert rest days into your schedule.

LighterPack –  A nice little tool that lets you track what you will carry with you and manage weight.  It also allows to share your list with others, once I get my list a little more flushed out I’ll be sure to post it here.

Yogi’s PCT Handbook – Not exactly an online resource but still very important. Yogi’s handbook is probably the only PCT planning book you’ll need. It includes tons of tips and advice from people that have hiked the PCT as was  information about the trail itself and the towns it passes through.

PCT Class of 2018 Facebook Group – A great way to connect with others planning on hiking the PCT in 2018, ask questions and help others.

I’m sure there are many more great resources out there that I’ve yet to come across, I’ll be sure to update this post when I find them. I’ll also be adding a dedicated list of resources to the sidebar in the near future.

…and put it in a backpack

When you set out to hike over 2,650 miles you start to think about what you’re going to bring with you and have strapped to your back for months on end. The weight of everything you carry becomes very important, even though a few extra ounces here and there doesn’t seem like much, it adds up fast.  The idea is to have a low base weight, which is all your gear minus consumables (food, water and fuel). Some people become so focused on lowering their base weight they end up doing things like cutting the handles off their toothbrush, or so i’m told. Most hikers end up with a base weight somewhere around 15-20 lbs, I’m shooting for 10 or less. Right now my base weight is probably close to 25 lbs, which unfortunately means to lighten my base wight I’m also going to have lighten my wallet. However, the upside is that I get to nerd out over backpacking gear, which  starts with this blog entry.

When thinking about backpacking gear the obvious place to start is with what will be carrying it all, your backpack. I currently have the Teton Mountain Adventurer 4000 (The 4000 is what sold me, it makes me think of Weight Gain 4000 from South Park. Beefcake!) which I love.  It weighs in at 4 lbs, without the included tarp / poncho. It has a capacity of 66 liters (4000 cubic inches), which is more than  I’ll need once I downsize all my gear,  has a nice access panel for the main compartment on the front and another smaller access panel on the side, which makes access super easy. It also has lots of fun straps and buckles to hold gear, I don’t even know what some of them are for. It also has standard things like a hydro port and sleeve, a pouch on the waist belt and some nice mesh pockets on the sides. Plus it’s black.  However, it is almost half of my desired base weight.

With that said I’m looking at a few different options for the PCT. Here is what i’m considering:

Hyperlite Mountain Gear Windrider 2400

This backpack weighs in at 1.76 lbs (the black version is somehow heavier at 1.85 lbs) and has a capacity of 40 liters (2400 cubic inches), which is a great size and weight. I especially like the three large mesh pockets and the two pouches on the hip belt. It is a single compartment pack with a roll top compared to a lot of packs that have a separate compartment at the bottom for your sleeping bag, which seems like a good idea but ends up limiting the use of your space.  While I really like this pack It is however pretty pricey coming in at $300.


Granite Gear Crown2 60

The Crown2 comes in a little heavier at  2.12 lbs but with that comes with some added capacity coming in at 60 liters (3660 cubic inches) and still has those nice big mesh pockets I like, although I don’t like how the compression straps run across them. Like the Windrider it has o  What makes the Crown2 stand out to me is that it has a removable lid compartment and a removable frame sheet which can bring the pack weight down to 1.7 lbs. It also has a removable and adjustable hip belt which should add some comfort. Paired with the added capacity, which I don’t think I’ll need but would be comforting to know i’d have it, I’m really liking the Crown2. It is also $100 cheaper than the Hyperlite coming in at $200.

ULA Circut

The most popular pack on the PCT last year. It has a lot of capacity coming in at 68 liters (4200 cubic inches) but weighing in a bit on the heavy side around 2.6 lbs. Still a single compartment pack and a really nice big mesh pocket for randomly shoving things in. What is nice about this pack is that when ordering you can specify your torso length, hip belt size, and chose your shoulder strap style.  I also like the cording that zigzags across the front.  From a cost perspective it comes in in between the price of the Windrider and Crown2 at $235.


Zpacks Arc Blast 

Weighing in at just 1.3 lbs with a capacity of 55 liters this pack has the best weight to capacity ratio of the packs I’m  considering.  A large mesh front pocket and sizable side pockets once again makes this pack appealing along with the compression cording along the sides. It also has an arc’d frame which creates an air gap between your back and the pack, which helps keep you cool and prevents clunky items from digging into your back. However, I’m a little curious about how this would feel with the weight being shifted out instead of against your back. As you may expect, the pack with the best weight to capacity ratio doesn’t come cheap, coming in at $325.

All of these packs have loads of features that I didn’t mention, I hope to be able to try each of them out and give an in-depth review of each (dependent on return policies).   Luckily time is on my side as the Teton Mountain Adventurer 4000 will get the job done until I take off for the PCT next year.

In my head

When you talk to someone who has completed the Pacific Crest Trail they will often tell you that the challenge in hiking the trial is not only a physical one but also, and perhaps more so, a mental one. On my recent hikes I’ve pushed myself pretty hard, seeing how fast I can make it to the end and If I can make it without stopping. In doing so hikes have become easier physically but more difficult mentally as you don’t take the time to enjoy the hike itself.  This became very obvious on my hike up Mount Teneriffe, a 14 mile hike with 4,000 feet of gain, this past Sunday.

I hiked up Mount Teneriffe last summer and remember it being strenuous but nothing that made me hate life, while I knew I was in for a challenge I knew it was one I could accomplish. The trail starts out very easy, about 2 miles on the very flat Mount Teneriffe Road before spotting the sign directing you towards Teneriffe Falls (aka Kamikaze Falls). After the junction things start go get fun, the trail becomes pretty steep and rocky as you make your way up to the falls.  As I made my way up the trail I found myself not really taking in my surroundings and focused on making progress. I wasn’t feeling it, which I found strange, but I pushed on. I made my way to the switchbacks where you start to see the bottom of the falls, I stopped to take some pictures and spent time texting them to friends as I continued on. I finally reached the best view of the falls, snapped a picture and moved on without spending time there to take it all in.

I found the trail that continues up from the falls to the summit of Mount Teneriffe, which is so steep you find yourself using your hands to help you make your way up. This is the part I knew would be challenging.  I pushed on until I made it up to the ridge and took a quick look around, finding myself in a cloud with no views. Onward I went, remembering all the challenging bits as I came across them.  The trail becomes faint as you make your way through the trees along the ridge.  I found myself becoming annoyed as I had to maneuver over a large boulder or up a steep part in the trail, but I continued to push on.  That feeling of annoyance became more prevalent as I hit the snow. I knew there would be snow I was just hoping it would be isolated to the summit. I had trekking poles and microspikes but couldn’t be bothered to get them out, luckily my new pair of Saucony Peregrine 7‎’s have some awesome traction and I slowly made my way through the snow. The snow became more prevalent the further I ascended and the trail became more faint. Then it started snowing.

As I continued up I started thinking about turning back, not because of the physical challenge or being cold, I was actually pretty comfortable, but because I just didn’t feel like hiking anymore.  I started to rationalize turning back, thinking about how I hadn’t seen a single person since the falls and concerned that I might lose track of the trail if it continued to snow.  I knew I was getting close to the summit and should just push on, so I did. The snow had frozen solid in spots and was a bit slippery, it was becoming more difficult to navigate without sending my foot into some soft snow which came up to my knee.  I eventually came to a clearing and looked up to see a group of trees where I expected to see the summit, I wasn’t as close as I thought.  This is the point I actually turned around.

I made my way down feeling somewhat defeated but at the same time relived. Heading down I passed some people on their way up who asked me if I had made it to the top. I told them that I didn’t make it because of the snow although I knew it wasn’t the snow that stopped me an issue but rather my lack of enthusiasm for hiking on this particular day. As I continued down the snow eventually turned to rain. I slowly worked my way down the tricky parts and while my jacket did a good job of keeping me dry for the most of the hike it eventually became saturated and I ended up feeling like Eeyore stuck under my own personal rain cloud.

However, throughout all my gloom and lack of interest in hiking I knew it was only temporary.  I know there will be days when i’m on the PCT and feel like I did hiking up Mount Teneriffe and that’s OK. There will be days that I don’t hike at all and days I feel like giving up but I know I will push through. This hike was a sobering reminder that I need to prepare mentally as well, finding the balance between performance and taking the time to enjoying the hike itself.

P.S.  Don’t worry Teneriffe, i’ll see you again soon.

What condition my condition is in

When hiking on the PCT people generally shoot for hiking, on average between 15 to 20 miles a day. When I first heard this I didn’t think much of it because that’s 15 to 20 miles in an entire day, whereas I generally do around 8 miles in half a day.  That was until I pushed myself last year and did over 20 in one day, those extra miles really made a big difference.  Not to mention that was last year when I was hiking a lot more than I have been in recent months (I blame the snow for that). I clearly need to figure out how i’m going to be able to hit my stride and get ready for months of hiking.

There are two schools of thought when it comes to physically preparing for the PCT.  The first is the obvious one, exercise like crazy, work out and do everything you can to get in shape so you’re ready to hit the ground running.  The second is pretty much the exact opposite of that, don’t train at all and let your body adjust on the trail. While it’s very tempting to go with option number two I’d rather spare myself the extra mental and physical stress on the trail.  Someone once said if you can’t do 20 miles in a day now, there is no way you will be able to do 20 miles in a day on the PCT.

So, what’s the best way to get in shape for a 2,650 mile hike?  Strap on your backpack full of gear and go hike, a lot. What are affectionately known as conditioning hikes. For some, like those that live where it’s completely flat, this might be a little tricky, luckily I live within a short drive to some pretty awesome and challenging hikes.  However, my choice in awesome challenging hikes has been somewhat limited due to the amount of snow in the mountains. Yes, I’ll have to deal with snow on the PCT but i’m not ready to go there just yet.  However, there is one hike in particular that is easy to get to, challenging and snow free and that is Mt. Si.

My first memory of Mt. Si was as a child, my family would make regular trips toeastern Washington to visit family a few times a year and I would always seem to find myself  staring up at Mt. Si in amazement as we drove by North Bend.  The mountains further east are much taller and awe inspiring but there was something about how
Mt. Si. sat by itself that drew my attention. I remember on one trip my mom mentioned that people would hike to the top and it kinda blew my mind.  However, despite fond childhood memories, accessibility, and a challenge I have a bit a love hate relationship with Mt. Si.  Well, not so much the mountain as some of the people that hike there.  Being so close to Seattle the trail has continuously gotten more and more popular over the years. The parking lot at the trailhead is huge yet it will still fill up and cars. On a recent trip I actually noticed that one of the local residents has a sign out advertising trail parking for $10, and it’s probably over a mile from the trailhead.  While i’m all for people getting outside and hiking you should always follow some basic trail etiquette.  It doesn’t bother me so much when people don’t know when to yield or don’t respond when you say hello, but I do have a problem with people that do things like throw their trash into the forest,  or blast music out of portable speakers.  So while I enjoy hiking Mt. Si it’s not always an enjoyable experience, but it’s become my go to hike and there is a great view from the top.


Luckily this year hasn’t been so bad (yet), this could be due in part that I always try to start hikes early in the morning, usually arriving at the trailhead before 7am ready to hike.  What’s new this year, as I get ready for the PCT, is that i’m hiking with a 35lb backpack and timing myself.  The Mt. Si trail is a little over 8 miles long with 3,150 feet of gain, not exactly a walk in the park, most people in decent shape make it to the top in 2 hours.  The first time I hiked Mt. Si this year was with a hiking group from work, I was not prepared for their pace.  They were all in excellent shape and were hiking light, meanwhile I was carrying a full pack and trying to overcome my winter of gluttony and laziness.  While I was able to keep up with them for a little bit they eventually left me in the dust, luckily one of my co-workers was with me and we seemed to keep the same pace while pushing ourselves to not let them get to far ahead of us. We ended up making it to the top in 1 hour and 45 minutes, the rest of the hiking group seemed a bit surprised that we weren’t too far behind them when they passed us on their way down.

Since then I’ve hiked Mt. Si two more times in just a few weeks, once making it in 1 hour 34 minutes and then 1 hour and 29 minutes, with my goal of 1 hour and 15 minutes.  Not only is it a race to 1 hour 15 minutes, but it’s also a race between me and the return of undesirable hikers as well as the snow melting on some more enjoyable hikes.  When I finally move on to another go to conditioner I’ll still enjoy staring up at Mt. Si as I did when I was a child. However, this time it will be while i’m sitting in the Starbucks drive through in North Bend waiting to order some cold brew after completing some other hike.


Wilderness First Aid 

In my continuing effort to not die while out on the Pacific Crest Trail, or in general,  I recently attended a NOLS Wilderness First Aid class, which was hosted by REI, with my girlfriend Cristina. The class was two full days and covered everything from treating blisters to what to do when someone is struck by lightning.  Luckily this class was nearby and didn’t require a long drive to some shady place like my ice axe class.

One of first things we learned  is how to perform a patient assessment (PAS), which was full of of  lists and acronyms.  When performing a  patient assessment you first want to check the scene, identifying any hazards, determining the method of injury (MOI),  put on gloves to protect yourself from any bodily substances (BSI), determine the number of patients and the general state of the patient.  In an emergency situation it may be difficult to remember all this so the provided us with our first list, which rhymes! (who doesn’t love a rhyming lists?)

  • 1 – I’m number 1 – Check for hazards to make sure it’s safe to provide assistance
  • 2 – What happened to you? –  Try to determine what happened
  • 3 – Not on me – Be sure you have your gloves on
  • 4 – How many more – Look for additional patients
  • 5 – Dead or alive  – Don’t say this one loud enough for the patient to hear

Once you make it through the list, guess what comes next? That’s right, another list!  The next thing to check the patient for any life threats, after introducing yourself and gaining consent from the patient of course.

  • A – Airway – Check for anything blocking the airways
  • B – Breathing – Look and listen to asses breathing
  • C – Circulation –  Check for pulse and any bleeding
  • D – Disability – Stabilize neck and head if chance of a spinal injury
  • E – Expose – Expose any serious wounds

Unfortunately the next section isn’t part of a list let alone one that rhymes.  First, perform a head to toe exam using your hands (appropriate touching! hands slightly curved and thumbs up (Our instructors explained that none of our scenarios would include any injury to the genitals so we skipped that area, which was for the best.) Talk to the patient asking them if they feel any pain or discomfort as you as you perform your exam.  Ask them to squeeze your fingers, push  their feet against your hands and then pull their toes against your hands with their feet.  After your head toe exam take the patient’s vitals, noting the time they were taken including:

  • Level of Responsiveness (LOR) –  Awake and oriented (AO), Awake and disoriented (AD) or Unconscious (U)
  • Heart Rate (HR)  – Including rhythm and quality
  • Respiratory rate (RR)  – Including rhythm and quality
  • Skin color, temperature and moisture (SCTM) – Pink / Pale, Warm / Cold, Moist / Clammy

The final part of the PAS is the SAMPLE (Yay! another list!). After asking the patient what their chief complaint is and cause of injury / illness gather the following, asking clarifying questions as they answer :

  • S – Symptoms – How they’re feeling beyond their chief complaint.
  • A – Allergies – Food, medication, plants / animals
  • M – Medications – What they are currently taking and when they last took it, including supplements or performance enhancing / recreational drugs
  • P – Pertinent medical history – Medical conditions or recent illness / surgeries
  • L – Last intake / output – What did they last eat / drink and when.  When was the last time they went to the bathroom and if there was anything unusual (heh. poop.)
  • E – Events leading up to the injury / illness –  What happened? Did they fall, drink some untreated water, or get abducted by aliens?

If you want to see what a full PAS looks like here is a great video by NOLS. After completing the PAS you will provide treatment and make a decision around evacuation. Even if you don’t know what to do with this information it’s good to gather it if you’re in an emergency situation as it will be helpful when help arrives.

After we learned about how to perform a PAS we got to practice! We split up into groups where one group would play the patients and another would be the rescuers.  The instructors would provide the patients with a scenario and pertinent information, sometimes we even had fake wounds.  We covered falls, head  and spinal injuries, dehydration, shock, burns, infection, musculoskeletal injuries, dislocations, hypothermia, frost bite & non-freezing cold injuries, heat exhaustion and many more scenarios.

On the second day we moved into practicing treatment, mainly around musculoskeletal injuries. I was lucky enough to be the recipient of an arm sling  and an awesome improvised leg splint. I will admit, the main reason I volunteered to be the patient in this scenario was due to the fact that it involved laying down and the instructor looked pretty exhausted after demonstrating the improvised leg splint.  I did however practice taping up a sprained ankle, which is the most common injury in the backcountry.

In one of the last scenarios Cristina and I were both patients and  paired up as a couple. The scenario was that we just flown from Seattle to Denver, hopped into a car and drove up to Pike’s Peak, essentially going from sea level to 14,000 feet in a matter of hours and resulting in altitude sickness. I had walked around a rock to go pee and ended up tripping dislocating my knee.  Things got fun when the instructor told us that one of our symptoms was irritability and that we had to argue with each other.  Now, I wouldn’t characterize Cristina as an angry person, she is very outgoing, friendly and kind.  So, when she started yelling “This is all your fault, I didn’t even want to come on this dumb trip! I hate hiking!!” I couldn’t stop laughing even though I was supposed to be irritable myself, not to mention in extreme pain. I’d try to regain my composure and yell back, saying something like “This wouldn’t have happened if you would have just stopped at a gas station so I could go to the bathroom instead of having to go behind a stupid rock!”. We, and our rescuers, ended up laughing a lot during the scenario, so much so I didn’t even feel any pain from my dislocated knee.

I’m really glad I invested the time to go to the class, I feel much more prepared to help out if I come across an injured person and really glad that Cristina is trained as well so she can help me when I do something dumb like trip over a rock. I’d highly recommend the class if you spend a lot of time outdoors, check the classes at your local REI or NOLS if you’re interested.

Oh snow! 

One of the things I will most likely run into on the PCT next year is snow in the Sierra Nevada Mountains. Since I have no idea what to do in snow other than, sled, build a snow man and throw snowballs, I jumped at the opportunity to take a free ice axe class from a complete stranger that simply posted about it in a PCT group on Facebook.

The class itself was at Hurricane Ridge out on the Olympic Peninsula, which is about 3 hours away.  Rather than wake up extra early to make drive while half awake I decided to drive out the night before and spend the night in Port Angeles. This seemed like a great idea at the time but after spending an hour there and grabbing something to eat I was mildly depressed and afraid of being stabbed.  A quick google search reveled that the crime index of Port Angeles is 3, with 100 being the safest 3 is also the percent of cities in the United States that Port Angeles is safer than. After learning that I decided to stay in my room and play video games.

In the morning I packed up and made my way to my car, ignoring the drug deal going down in the parking lot, and made my way to the Olympic National Park Visitor Center to meet up with everyone. When I arrived and met everyone Steve, who was teaching the class, pointed out the monitor showing a live view of Hurricane Ridge… it was pure white, luckily the road was open but the weather was  going to be challenging.   We piled into a couple cars and slowly made our way up to the Hurricane Ridge Visitor Center.  Everything was going smoothly until we saw a car coming down the road way too fast as it began to slide in front of us, everything seemed to move in slow motion as the car passed just inches in front of the car I was in before plowing into a snow bank.  A little shaken we got out made sure everyone in the car was OK and the car was quickly pushed out of the snow bank to continue down the mountain.  We made our up to the top, going even slower than before.

Hurricane Ridge lived up to it’s name being very windy with lots of blowing snow.  We quickly grabbed the ice axes and snow shoes  and made our way inside the visitor center.  Due to the weather Steve started going over a few of the basics of handling an ice axe in the visitors center.   Key points are:

  • When picking out  an ice axe  it should come just above your
    ankle when you are holding it by your side.
  • Always carry the ice axe in your uphill hand.
  • Carry the ice axe with the adze facing forward and the pick facing backwards.
  • Ice axes are easy to attach to a gear loop on the bottom of your backpack. Just slide it in, twist so the pick side is facing inwards and flip it up towards the top of the pack so the spike is secured at the top with the head at the bottom.

Steve also demonstrated how to perform a self arrest which seemed a bit tricky to do indoors.  After covering the basics we headed outside, strapped on some snowshoes and made our way to the ledge.

After Steve went over some of the basics again the fist thing we had to do was make a snow slide, somewhere that we could slide down and practice stopping ourselves with an ice axe.   Going down was the easy part but getting back up was a little more challenging. Luckily there was about 10 of us so after a few passes we had a nice slide and a set of snow steps going back up to the top.  Then it was time to practice a self arrests in every position possible sliding down on your tummy, on your back, on your belly head first, on your back head first and then eventually Steve just started pushing people over.  I was at a bit of a disadvantage since my jacket and pants, while very waterproof, were very slick and I picked up speed rather quickly.

In addition to performing self arrests we also practiced performing a self belay, which should be how you actually stop yourself before you start sliding down a mountain and having to self arrest, but practicing self arrests was much more fun. We also practiced climbing up, traversing and descending from a small snowy hill. At that point we grabbed our gear and headed back in side.  If you’re interested in how to do all this crazy ice axe stuff here’s a video that goes over some off the techniques.

Once we trekked back the extremely cold blowing snow and made it to the warmth of the visitors center Steve went over a few additional points about being out in the snow.  One side point he made is that in recent years there have been a lot of less than desirable  people hiking the PCT, the kinds of people that don’t pack out their trash or follow common trail etiquette rules and asked everyone to call them out if we someone being a jerk. Some of the things that I took away regarding being out in the snow were:

  • If you’re camping on top of snow you’ll stay warmer by putting extra martial under your rather than on top of you
  • Bury your water bottles upside in snow to keep them from freezing completely. Since water freezes from the top having the bottle upside down keeps the mouth from freezing solid.
  • Don’t stuff your sleeping bag full of clothes to stay warm, this stretches out your sleeping bag and compresses the fill, which makes it less effective.
  • If you get caught in an avalanche you have about 30 minutes before you’re dead and the snow becomes as hard as concrete.

After the class concluded Steve passed out some cans of PCT Porter and spent time answering other questions from the group (most of whom are probably out on the trial right now as I was the only one not hiking this year).  When I asked him what we could do in thanks for facilitating the class free of charge he just said to pay it forward.  So, if you you want to learn some ice axe basics and practice with me, i’ll be more than happy to show you what I know.. and then you push you down a snowy hill.
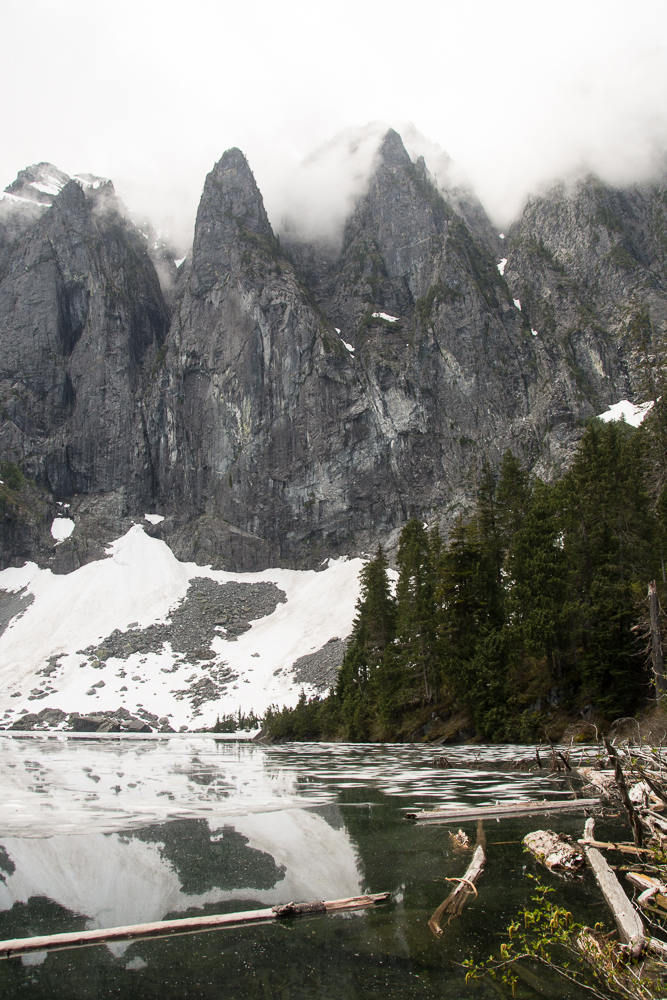